
Many successful apps allow users to interact, compete or build social relationships. Features like an in-app chat, a friend system or leaderboards help to increase app retention and engagement rates. This applies for games as well as apps. The SocialView makes it easy to add such features. It takes advantage of ready-made services and also offers e.g. user profiles & authentication, cloud storage and much more. If you think this sounds complex, don’t worry: This post shows you how to add such features without a hassle.
Using Social Services is Easy!
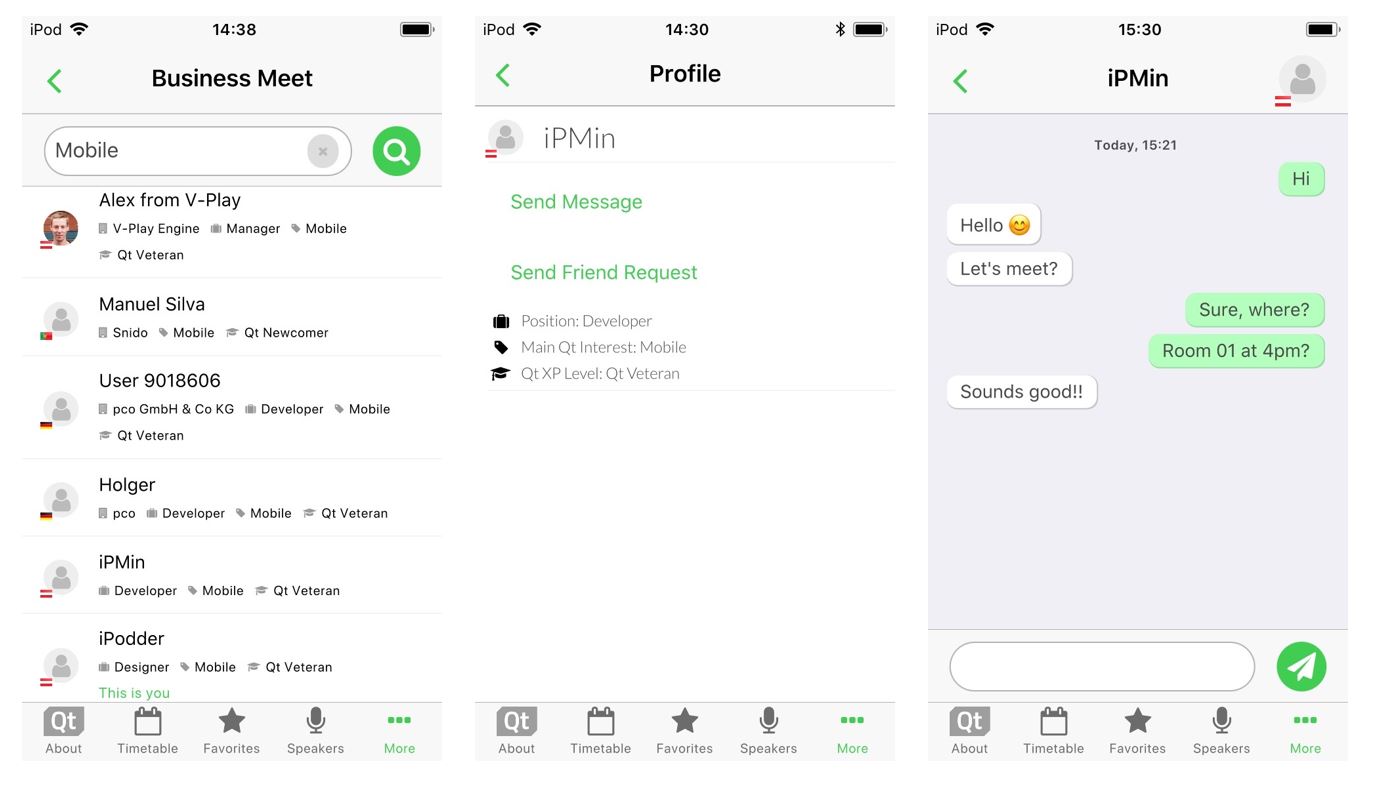
… at least with the SocialView, which includes many ready-made social features. This makes it easy for you to create apps with e.g. user profiles, leaderboards or a messaging and friend system. For example, this year’s conference management app for the Qt World Summit 2017 uses these services and allows you to:
- Search conference attendees to schedule Business Meetings.
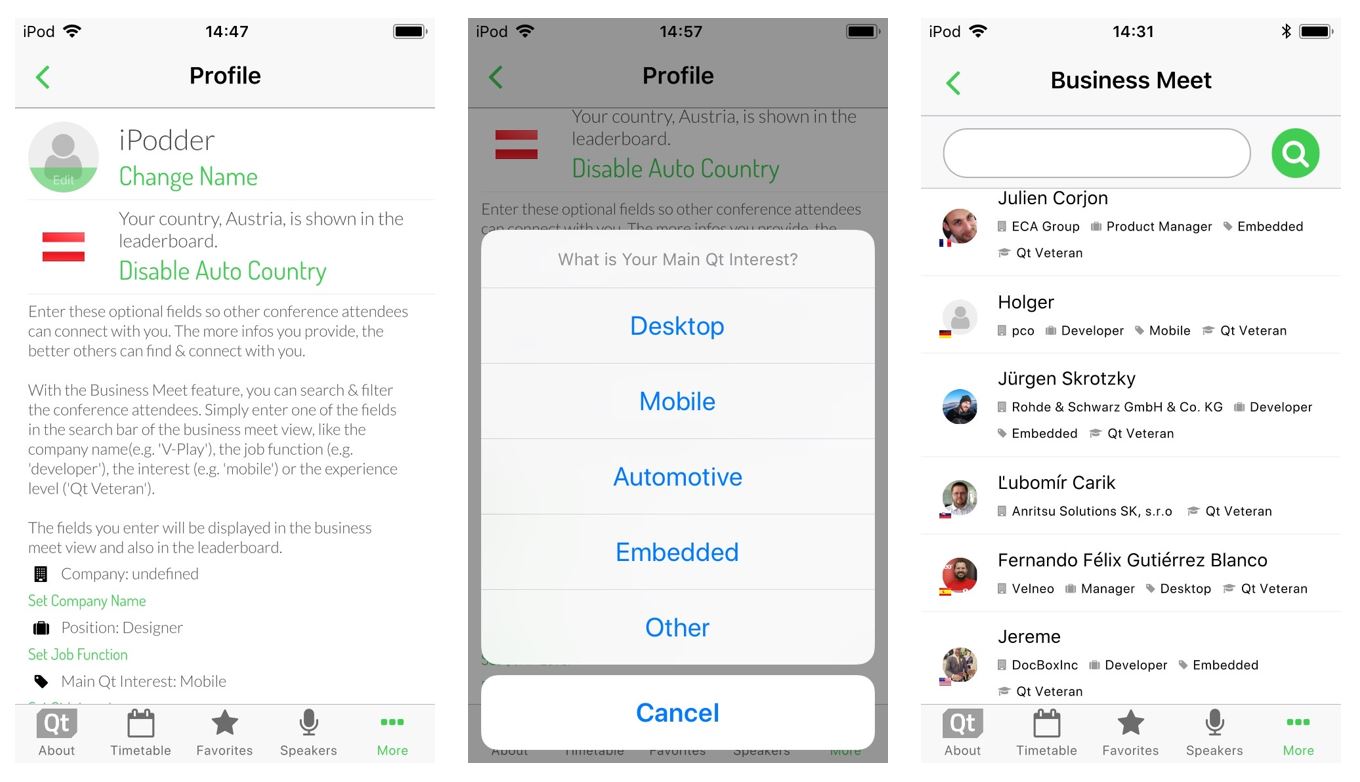
- Store custom user data like the company, job position or main Qt interest.
- View user details and find conference attendees that match certain criterias.
- Log in via Facebook to synchronize your data across devices.
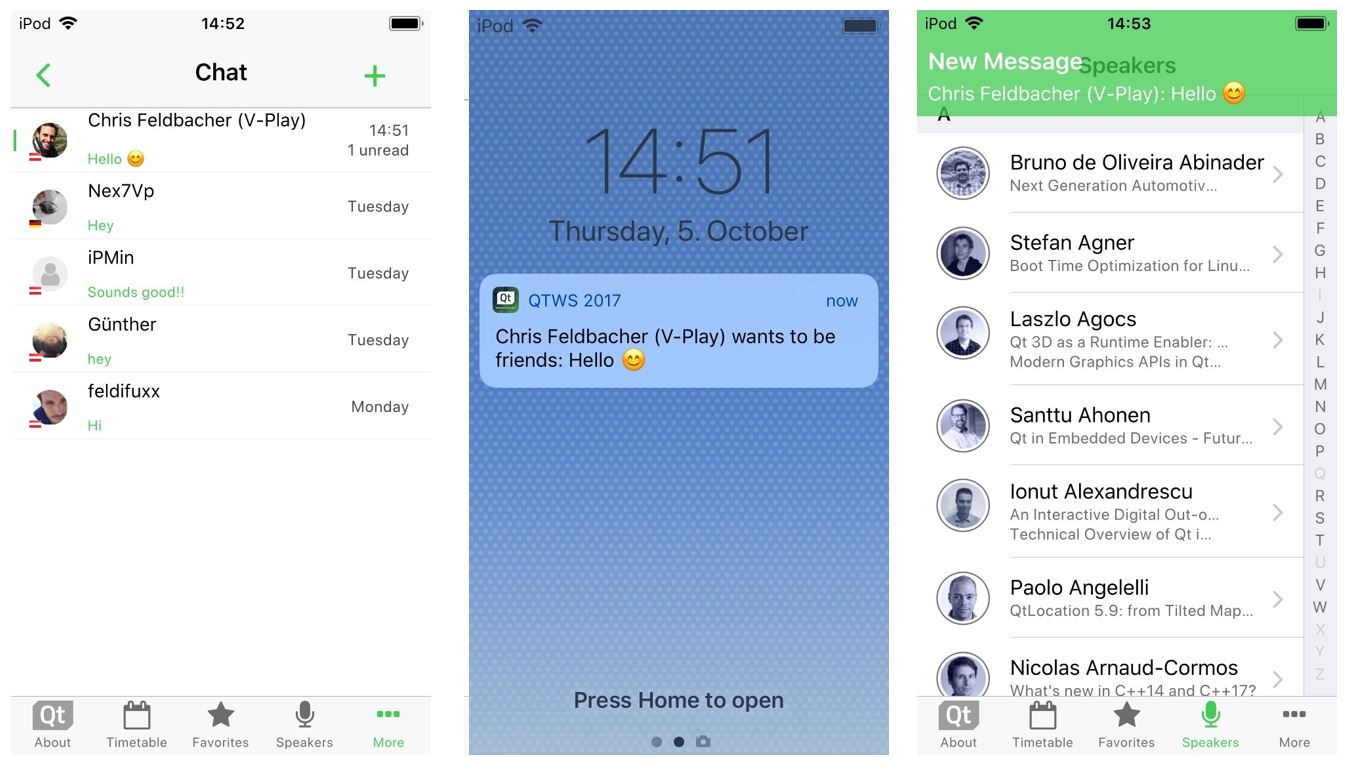
- Become friends and get in touch with the included in-app chat.
- See a leaderboard with a ranking of users that favor many talks and are active.
You can have a look and try out the features by downloading the app for iOS or Android:

![]()
This is already a rich feature set, but there is much more you can do. The SocialView is extensible and allows to customize all features!
A cloud-based backend and easy-to-use client QML components build the core of the view. The SocialView integrates these cloud services so you can use them in your app. Among many other features, the SocialView services include:
- User Profiles and Authentication: Each user registers with the social services as soon as he first opens your app. No registration required.
- Social Leaderboards: You can let players compare against each other in a competitive way, keeping them playing.
- Fully Customizable UI: With the strength of QML you can customize all views to your app and give an extra-polished look.
- Integrated Cloud Storage: Store project-specific data for your users in the cloud.
- Friend System: Add your friends or make new friends with other users you meet in-app.
- In-App Chat & Push Notifications: You can chat with your friends, even if they’re not online. This makes it easy for your users to get in touch. They also receive Push Notifications for each incoming message.
- Facebook Login & Account Synchronization: You can allow users to log-in with Facebook. This enables them to synchronize their profile and progress across devices.
- Native Look and Feel: The view provides a native style and user experience on both iOS and Android.
- Fully Cross-Platform: All features work cross-platform, so your iOS users can also connect or play with Android users.
To see how to add such services, have a look at the Qt World Summit 2017 app. It shows how to use the SocialView and enriches it with custom features. The full updated source code is available for you on GitHub.
How to Add User Profiles or an In-App Chat with the SocialView
The SocialView offers a flexible usage for both games and apps. You can add user profiles, leaderboards or the messaging and friend system to any project.
Use the SocialView Standalone
The view contains several pages that each cover a certain use-case:
- profilePage – shows the user profile a GameNetworkUser
- leaderboardPage – shows the highscores for a certain leaderboard and time frame
- inboxPage – shows the active chats of the currently logged-in user
- chatPage – shows a chat of the logged-in user with another user
- newMessagePage – shows a user search and allows to start a chat
If not specified otherwise, it shows the user profile of the logged-in user by default. This is how a minimum example setup for a full-featured SocialView integration looks like in QML:
import Felgo 3.0

GameWindow {
 VPlayGameNetwork {
   id: gameNetwork
   gameId: 285
   secret: "AmazinglySecureGameSecret"
   multiplayerItem: multiplayer
 }

 VPlayMultiplayer {
   id: multiplayer
   appKey: "dd7f1761-038c-4722-9f94-812d798cecfb"
   pushKey: "a4780578-5aad-4590-acbe-057c232913b5"
   gameNetworkItem: gameNetwork
 }

 SocialView {
   id: socialView
   gameNetworkItem: gameNetwork
   multiplayerItem: multiplayer
 }
}
No extra code needed. The view also is a full-featured NavigationStack type by itself. So you can configure the initialPage or e.g. push the default leaderboard with simple call to:
socialView.push(socialView.leaderboardPage)This is the perfect way for integrating the view to Felgo Games.
Add SocialView Pages to your App Navigation
The SocialView contains several individual social pages. They are independent pages, but linked to the SocialView behind the scenes. Each page can work with any NavigationStack layout you might use in your existing Felgo App.
The following code snippet creates an app with two separate navigation tabs. One for the user profile, and one for showing the inbox of the friend and messaging service:
import Felgo 3.0

App {

 VPlayGameNetwork {
   id: gameNetwork
   gameId: 285
   secret: "AmazinglySecureGameSecret"
   multiplayerItem: multiplayer
 }

 VPlayMultiplayer {
   id: multiplayer
   appKey: "dd7f1761-038c-4722-9f94-812d798cecfb"
   pushKey: "a4780578-5aad-4590-acbe-057c232913b5"
   gameNetworkItem: gameNetwork
 }

 SocialView {
   id: socialView
   gameNetworkItem: gameNetwork
   multiplayerItem: multiplayer
   visible: false // hide social view, as we show the pages on custom NavigationStacks instead
 }

 // main navigation
 Navigation {

   // first navigation item: Profile
   NavigationItem {
     title: "Profile"
     icon: IconType.user

     NavigationStack {
       initialPage: socialView.profilePage
     }
   }

   // second navigation item: Chat Inbox
   NavigationItem {
     title: "Chat"
     icon: IconType.comment

     NavigationStack {
       initialPage: socialView.inboxPage
     }
   }
 }
}
This already shows the flexible usage possibilities of the new view. The approach in the above example works with the page properties of the SocialView. This is the fastest way for adding e.g. the own user profile or the default leaderboard to your app navigation.
You can also show a different user profile or leaderboard. The SocialView provides functions that let you pass your desired settings. For example, the following call displays the profile of a certain user:
socialView.pushProfilePage(gameNetworkUser, targetNavigationStack)The function also allows to specify the target NavigationStack for adding the page. Similar functions exist for all available SocialView pages. So you can integrate the social pages anywhere in your app!
Customize the Features and Look of your Social Services
Each project is different and has its own unique style. To add your own style to the view, there are several customization options you can use. They allow to:
- Match the view colors and fonts with your project style.
- Enrich the mobile UI design with custom elements and features.
- Introduce completely new social pages.
The Felgo Apps types build the core of the customizable SocialView UI. This means, it also comes with a native look and feel for Android and iOS and e.g. offers a native back navigation.
Change the View Colors and Fonts
The SocialView offers several properties for the general look of all social pages. It is possible to customize used fonts and colors to match your project style with a few lines of code.
The view tint matches the configured color of your app theme by default. No further adjustments needed if this is the color of your choice for the social pages.
The following example disables the user country feature and sets an orange tint. It also switches to the configured theme font instead of the default social view font:
SocialView {
   gameNetworkItem: gameNetwork
   multiplayerItem: multiplayer

   // custom styling
   tintColor: "orange"
   tintLightColor: Qt.lighter(tintColor, 1.2)
   countryCodeEnabled: false
   bodyFontName: Theme.normalFont.name
   headerFontName: Theme.normalFont.name
 }
Add Custom UI Elements with Delegates
The Felgo Game Network service allows to store project-specific data of your users. In your app, this data is available with the customData property. The Qt World Summit app also sets this field to store personal information, e.g. the Qt interest, on the profile page.
But how can you display the UI for editing or showing this information in the user profile?
The SocialUserDelegate type lets you provide the full QML code of such additions. It is set up to represent a single GameNetworkUser, which the view displays in the social pages.
Let’s say you allow users to enter a custom description text somewhere in your app, which you store as custom data. This simple code snippet allows you to display the description in the user profile:
SocialView {
   id: socialView
   gameNetworkItem: gameNetwork
   multiplayerItem: multiplayer

   // show custom user data in profile
   profileUserDelegate: SocialUserDelegate {
     AppText {
       text: gameNetworkUser.customData

       x: dp(Theme.navigationBar.defaultBarItemPadding) // add indent / padding
       width: parent.width-x
       font.pixelSize: sp(14)
       wrapMode: AppText.WrapAtWordBoundaryOrAnywhere

       // add social view style to text
       font.family: socialViewItem.bodyFontName
       color: socialViewItem.bodyColor
     }
   }
 }
That is all you need! The new custom text now shows up in the user profile page:
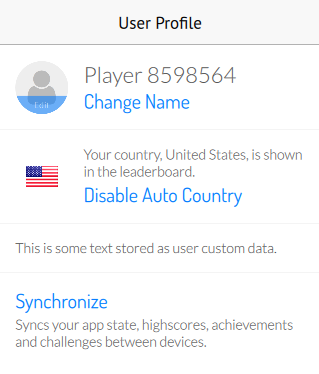
The above example uses the profile user delegate, which is not set to a specific item by default.
Other delegates for e.g. the leaderboard and inbox page are already predefined. Each delegate item represents a single user of the displayed list in this case.
To customize these user lists, you can overwrite the used delegates. This example replaces each score entry of the leaderboard with a custom QML item:
SocialView {
   id: socialView
   gameNetworkItem: gameNetwork
   multiplayerItem: multiplayer

   leaderboardUserDelegate: SocialUserDelegate {
     height: col.height

     // show user name and score below each other
     Column {
       id: col
       anchors.centerIn: parent
       AppText {
         anchors.horizontalCenter: parent.horizontalCenter // center name horizontally
         text: gameNetworkUser.name
       }
       AppText {
         anchors.horizontalCenter: parent.horizontalCenter // center score horizontally

          // it is possible to access each response entry of the related API request using modelData
         text: "Score: " + modelData.value
       }
     }
   }
 }
The new social delegate system is the perfect way to customize the social pages to your liking! But that is not all, you can even throw in completely custom social pages.
How to Create New Social Pages
The ability to add your own delegates also opens another possibility. You can extend the view with custom social pages, which extend the new SocialPage base type. It works together with SocialView to:
- Offer quick access to the Game Network and Multiplayer features.
- Show a loading indicator in the navigation bar. Your users will see that there’s a loading process going on whenever there are pending API requests.
- Apply the configured SocialView styling like the view tint color or body font.
Let’s upgrade the profile page and add a button. It will take us to a new social page, where we show the custom data of the user:
SocialView {
   id: socialView
   gameNetworkItem: gameNetwork
   multiplayerItem: multiplayer

   profileUserDelegate: SocialUserDelegate {
     id: userDelegate
     SocialViewButton {
       anchors.horizontalCenter: parent.horizontalCenter
       text: "Show User Details"
       onClicked: {
         // show custom social page and pass gameNetworkUser
         parentPage.navigationStack.push(userDetailPage, { gameNetworkUser: userDelegate.gameNetworkUser  })
       }
     }
   }
 }

Component {
   id: userDetailPage
   SocialPage {
     // add a property for the user we want to show on the page
     property GameNetworkUser gameNetworkUser: null

     // show custom data
     AppText {
       text: gameNetworkUser.customData

       x: dp(Theme.navigationBar.defaultBarItemPadding) // add indent/padding
       width: parent.width-x
       font.pixelSize: sp(14)
       wrapMode: AppText.WrapAtWordBoundaryOrAnywhere

       // add social view style to text
       font.family: socialViewItem.bodyFontName
       color: socialViewItem.bodyColor
     }
   }
 }
This addition uses the profileUserDelegate to extend the profile page. It adds a button, which takes us to a new custom social page:
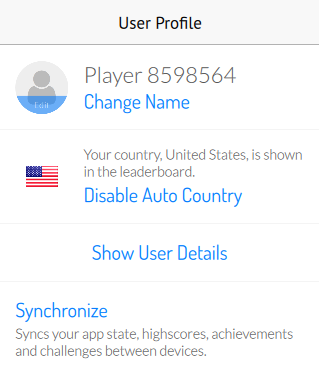
That page only shows the plain string text value of customData. But of course you could do much more. The following example extends the above code to allow saving the favorite song and food for each user. The userDetailPage now shows input fields to edit and store the data for the logged-in user. When viewing the profiles of other users, it just displays the stored values:
import Felgo 3.0
import QtQuick 2.9

App {
 VPlayGameNetwork {
   id: gameNetwork
   gameId: 285
   secret: "AmazinglySecureGameSecret"
   multiplayerItem: multiplayer
 }

 VPlayMultiplayer {
   id: multiplayer
   appKey: "dd7f1761-038c-4722-9f94-812d798cecfb"
   pushKey: "a4780578-5aad-4590-acbe-057c232913b5"
   gameNetworkItem: gameNetwork
 }


 SocialView {
   id: socialView
   gameNetworkItem: gameNetwork
   multiplayerItem: multiplayer

   profileUserDelegate: SocialUserDelegate {
     id: userDelegate
     SocialViewButton {
       anchors.horizontalCenter: parent.horizontalCenter
       text: "Show User Details"
       onClicked: {
         // show custom social page and pass gameNetworkUser
         parentPage.navigationStack.push(userDetailPage, { gameNetworkUser: userDelegate.gameNetworkUser  })
       }
     }
   }
 }

 Component {
   id: userDetailPage
   SocialPage {
     title: "User Details"
     // add a property for the user we want to show on the page
     property GameNetworkUser gameNetworkUser: null

     // parse the JSON data stored in customData property, if it is set
     property var userCustomData: !!gameNetworkUser && !!gameNetworkUser.customData ? JSON.parse(gameNetworkUser.customData) : {}

     // for logged-in user, allow editing the custom fields
     Column {
       x: dp(Theme.navigationBar.defaultBarItemPadding) // add indent
       y: x // padding top
       width: parent.width-x
       spacing: x
       visible: gameNetworkUser.userId === gameNetworkItem.user.userId // only show if profile of logged-in user

       AppText {
         text: "Edit the fields below to set your details."
       }
       AppTextField {
         id: songInput
         text: !!userCustomData.song ? userCustomData.song : ""
         placeholderText: "Enter your favorite song."
       }
       AppTextField {
         id: foodInput
         text: !!userCustomData.food ? userCustomData.food : ""
         placeholderText: "Enter your favorite food."
       }
       SocialViewButton {
         text: "Save"
         onClicked: {
           var customData = JSON.stringify({ "song": songInput.text, "food": foodInput.text })
           gameNetworkItem.updateUserCustomData(customData)
         }
       }
     }

     // for other users, show data of custom fields
     Column {
       x: dp(Theme.navigationBar.defaultBarItemPadding) // add indent
       y: x // padding top
       width: parent.width-x
       spacing: x
       visible: gameNetworkUser.userId !== gameNetworkItem.user.userId // only show if profile of other user

       AppText {
         text: "Favorite Song: "+(!!userCustomData.song ? userCustomData.song : "")
       }
       AppText {
         text: "Favorite Food: "+(!!userCustomData.food ? userCustomData.food : "")
       }
     }
   }
 }
}
The detail page now allows to enter and store the custom data: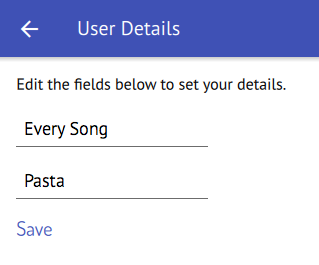
You can see all customization features in action with the Qt World Summit 2017 app on GitHub:
![]()
Now it is up to you to add customized social features to your apps – the SocialView is definitely the right tool for it!
More Posts Like This
Release 2.14.1: Update to Qt 5.9.3 | Use Live Code Reloading on macOS and Linux
How to Make Cross-Platform Mobile Apps with Qt – Felgo Apps