You want to use QML live code reloading to develop your application and you have custom C++ code? Felgo version 2.16.1 introduces the Live Client Module. You can use it to add QML live reloading features to your own application. This release also adds an important change for iOS app publishing, as well as other fixes and improvements.
Create Mobile Apps with QML Live Reloading on Desktop, Android and iOS
With the Felgo SDK, you can develop your mobile apps with live code reloading. View your app on any connected device at the same time, without waiting for slow deployment.
Tip for Qt developers: You can also use live code reloading with Qt Quick applications that do not include Felgo components! This means if your app uses for example an ApplicationWindow as root component and does not use any Felgo import, the live code reloading for your QML code still works.
How does QML Live Reloading with Felgo Live Work
Time for a quick detour to the basics of a Qt application. It consists of 2 layers.
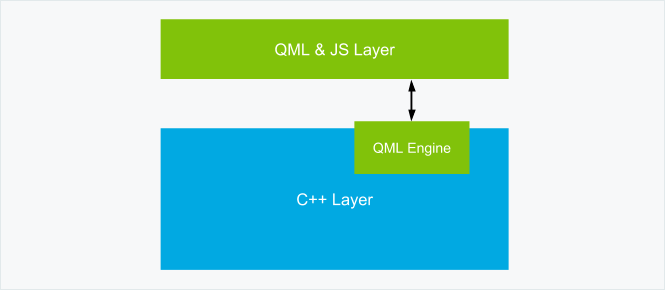
The C++ layer handles all the core functionality and does the heavy lifting. The C++ layer also contains the QML engine, which is able to load QML code at runtime. Thanks to the QML engine, you can reload the whole QML layer at runtime.
This is exactly what happens when you hit save, and Felgo Live reloads your application. Your changed QML, JS and asset files are transferred to the Felgo Live Client, and the QML layer is reloaded.
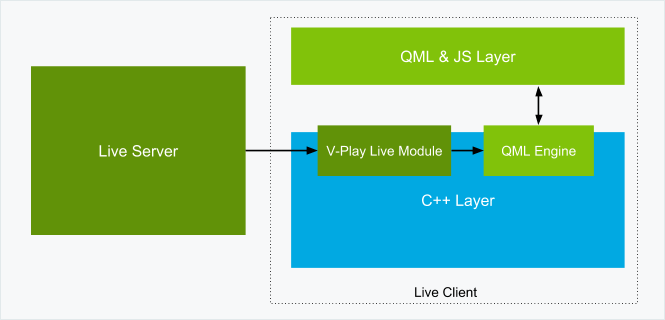
All your custom C++ code however is part of the C++ layer. This code requires a build step to compile and deploy with the application. Many of you guys requested to be able to use your own C++ code together with QML live reloading. Good news for you, you can now use the Felgo Live Client Module in your own applications!
How to Build your own Live Client with Custom C++ and Native Code
With the new Live Client Module, you can add live code reloading to your own application in seconds. All you need to do is perform 2 simple steps:
1. Add the felgo-live config to your pro file
Open the *.pro file of your project and change the following line:
CONFIG += felgoto this:
CONFIG += felgo felgo-liveOr you can also use 2 separate lines like this, so you can enable/disable the Live Client Module easier:
CONFIG += felgo
CONFIG += felgo-live
2. Start the Live Client instead of your project main QML file
Go to your project’s main.cpp file and add the following line at the include section at the top:
#include <FelgoLiveClient>You do not want to load your project’s main QML file initially, instead you want to start as Live Client. Your project will then start with a connection screen and you can connect to the Live Server.
Remove the following 2 lines in your main.cpp file. You will need those lines for standard deployment or publishing later, so only comment them like this:
// felgo.setMainQmlFileName(QStringLiteral("qml/Main.qml"));
// engine.load(QUrl(felgo.mainQmlFileName()));
Now we can start the Live Client with one line of code. Add it just before the return statement at the end of the main function:
FelgoLiveClient liveClient(&engine);That’s it, you turned your own project into a Live Client. Build and run your project for any platform you want, Windows, macOS, Linux, Android or iOS.
Note: Run your application using the “Run” option in Qt Creator (the standard green run button)!
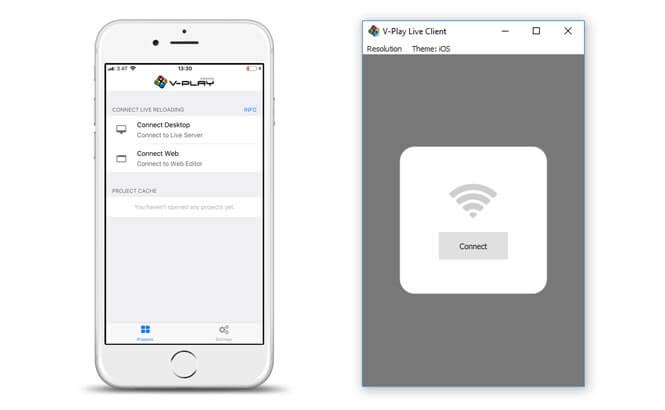
You can connect it to your Live Server just like the default Live Clients.
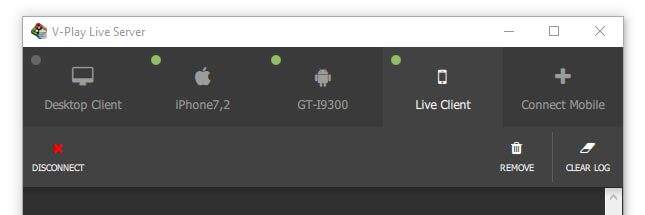
Tip: Disable the automatic start of the default Live Client in your Live Server, because you will use your own client instead!

To switch back to standard deployment, for example to publish your app, just undo the changes above.
Use Cases with new Live Client Module
There also is a more detailed blog post about communication between C++ and QML. These are only short examples, to give you an idea of what you can do.
Add a Global C++ Object as a Context Property
You can make C++ objects accessible from anywhere in your QML files, with a context property.
Expose an object of your custom C++ class with a context property, e.g. in your main.cpp:
int main(int argc, char *argv[])
{
  MyGlobalObject* instance = new MyGlobalObject();
  engine.rootContext()->setContextProperty("myGlobalObject", instance);
}
Now you can access your context property from anywhere inside your QML files.
AppButton {
  text: "Do Something"
  onClicked: myGlobalObject.doSomething("with this text")
}
You can find a full example including the C++ files here: How to Access a C++ Object from QML
Register your C++ Class as QML Type
Another option to communicate between C++ and QML, is exposing your C++ class as QML type.
Expose the QML type, e.g. in your main.cpp:
#include "myqmltype.h"

// …

int main(int argc, char *argv[])
{
  // …

  // MyQMLType will be usable with: import com.yourcompany.xyz 1.0
  qmlRegisterType<MyQMLType>("com.yourcompany.xyz", 1, 0, "MyQMLType");

  // …
}
Use your custom QML type anywhere in your QML files:
import com.yourcompany.xyz 1.0

// …

MyQMLType {
  id: myType
  someProperty: "someValue"
  onSomePropertyChanged: doSomething()
}
You can find a full example including the C++ files here: How to Register your C++ Class as a QML Type
GitHub Example for using C++ with QML
You can also download this example project from GitHub. The Live Client Module integration steps are already prepared in the FelgoCppQML.pro and main.cpp files, you only need to uncomment them!
Use All Felgo Plugins with Live Reload
Some plugins, like push notifications, rely on the app identifier of an application. With the Live Client Module, you will build your applications with your own app identifier set. This means you can use those plugins with live reloading as well.
Teaser: Use Live Code Reloading also for Published Apps
To see code changes reload your app within seconds on mobile or Desktop without a recompile is a magic moment. Once you experienced it, you’ll wonder how you could develop without it as it is THE biggest time improvement for development.
What if you could also update your published app in the app stores (or on Desktop) just as simple as during development? Your users would not need to update your app via the app stores, but you can choose which version you want to provide them. And this update is available to your users within seconds, no app store update process required.
We are currently working on this solution. If you are interested in access to it, please contact us here.
iOS Bundle Identifier Migration
Starting with Felgo 2.16.1, the app’s bundle identifier for iOS is set using the PRODUCT_IDENTIFIER setting in your *.pro project configuration. To adapt to the new setting perform the following steps:
1. Open your *.pro project file and add the following block:
# configure the product's bundle identifier
# this identifier is used for the app on iOS
PRODUCT_IDENTIFIER = com.your.company.YourApp
where com.your.company.YourApp matches the CFBundleIdentifier setting of your existing Project-Info.plist configuration.
2. Open your Project-Info.plist in the ios subfolder and replace the value of CFBundleIdentifier with $(PRODUCT_BUNDLE_IDENTIFIER), so that it looks like the following:
<key>CFBundleIdentifier</key>
<string>$(PRODUCT_BUNDLE_IDENTIFIER)</string>
3. After running qmake, your iOS build uses the new setting.
Note: Make sure to transition your project to this new format, as otherwise app store build uploads from Xcode 9 might fail.
All Felgo Project Wizards already use the new project setting.
More Improvements and Fixes
- SimpleRow now includes a badgeValue property that allows to show a specified value in a badge style on the right edge of the row.
 Test this example on your mobile phone now! Run This Example
import Felgo 3.0
import QtQuick 2.0

App {
  id: app

  Navigation {
    navigationMode: navigationModeDrawer

    NavigationItem {
      icon: IconType.heart
      title: "Badge Item"
      badgeValue: "9"

      NavigationStack {

        Page {
          title: "My First App"

          SimpleRow {
            badgeValue: "5"
            text: "Badge Row"
          }
        }
      }
    }
  }
} - NavigationItem uses the new SimpleRow::badgeValue property to show a specific value displayed in a badge style on the right edge of the row, if displayed with navigationModeDrawer.

Code Example - You can now use the SearchBar::textField property to access the internal AppTextField of the search bar.
- Fixes a potential crash and function evaluating warnings during object destruction when a Navigation and NavigationStack setup is used together with a Loader item.
- Resolves a possible memory leak on iOS during app shutdown with the GoogleCloudMessaging and GameCenter plugin.
How to Update Felgo
Test out these new features by following these steps:
- Open the Felgo SDK Maintenance Tool in your Felgo SDK directory.
- Choose “Update components” and finish the update process to get this release as described in the Felgo Update Guide.
If you haven’t installed Felgo yet, you can do so now with the latest installer from here. Now you can explore all of the new features included in this release!
For a full list of improvements and fixes to Felgo in this update, please check out the change log!
More Posts Like This

How to Make Cross-Platform Mobile Apps with Qt – Felgo Apps
Release 2.16.0: iPhone X Support and Runtime Screen Orientation Changes

Release 2.15.1: New Firebase Features and New Live Code Reloading Apps | Upgrade to Qt 5.10.1 & Qt Creator 4.5.1
New Mobile App Development Documentation with QML Live Reloading of Code Snippets

