The introduction of WebAssembly on most major browsers around 2017 opened up a new world of possibilities. Apps and libraries written in languages other than JavaScript, like C++, Rust, C#, Go and Python, can now run embedded in your browser. This means that you can compile and publish native apps for the web, without in-the-middle stores, complex deployment steps and app reviews getting in the way of you and your users.
- What is WebAssembly?
- Qt WASM Example: High-performance Maps & Routing in the Browser
- Felgo for WebAssembly: Cross-platform Web Applications Made Easy
- Seamless Communication between Qt Quick WASM App and the Browser
What is WebAssembly?
Before the introduction of WebAssembly, native development and web development were separate domains. Porting mobile or desktop applications to the browser was not possible. Cross-platform apps that built on web technologies suffered drawbacks in performance and user-experience. It was hard to imagine a high-performant and native cross-platform solution that also included the web.
![]()
To solve this problem, the W3C WebAssembly Community Group with representatives from companies like Google, Microsoft and Mozilla worked together on a solution that builds upon existing and standardized web technologies: The WebAssembly.
WebAssembly (WASM) defines a binary format for applications that browsers can run with high performance. All major desktop browsers already natively support WASM, and mobile browser support is growing fast as well. With WebAssembly, we now have a true cross-platform format for deploying compiled native apps to the web.
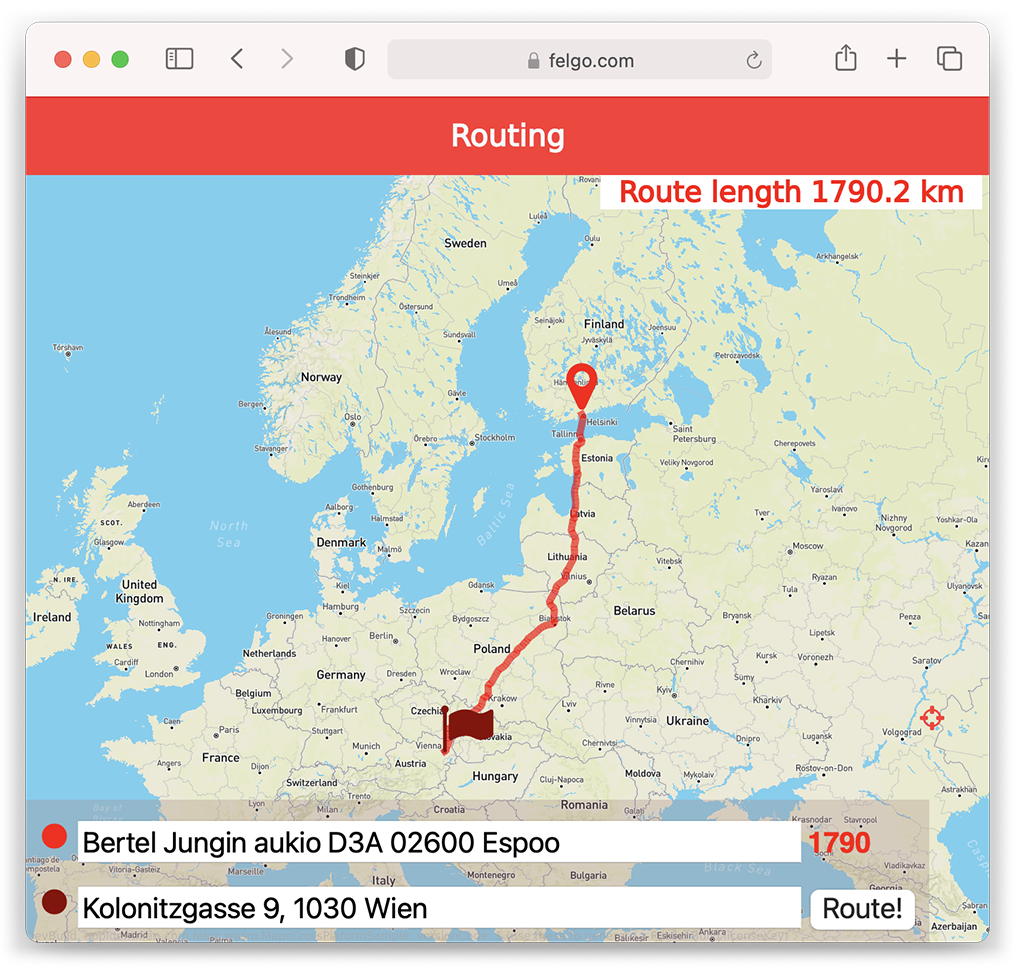
Qt WASM Example: High-performance Maps & Routing in the Browser
Qt is the go-to tool for professional geolocation applications. This is due to the out-of-the-box support for a wide range of geodata providers, such as Mapbox, HERE, OpenStreetMap and Esri, as well as it’s unparalleled native performance across all target platforms.
When browsers started to have mature support for OpenGL ES (WebGL) and WASM, a Qt for WebAssembly port also became possible. Fast forward to today and we can build Qt-based applications for the web, just like for any other Qt platform. Try the Qt-driven Map and Navigation Browser Demo to see the magic yourself:

Felgo for WebAssembly: Cross-platform Web Applications Made Easy
As a Qt Technology Partner, the Felgo Framework extends Qt with many useful components that simplify cross-platform development for Mobile, Desktop, Embedded and the Web. Felgo Apps are responsive by nature and can run on any target platform and device, regardless of the screen size and resolution. This means that browser window resizing for WASM applications is directly supported as well.
Felgo makes it easy to compile a project for WebAssembly while also targeting Android, iOS, Windows, macOS, Linux and Embedded - all from the same source code.
The WebAssembly Map and Navigation Example is built with Felgo and can run on all supported platforms. To see how it looks on a mobile device, get the Felgo Developer App and start the Map Browser Communication demo on your phone:

Seamless Communication between Qt Quick WASM App and the Browser
It is great to share code across platforms, but some use-cases still need platform-specific customization. For example to optimize the look & feel by adapting the UI on-demand. Or to integrate features that rely on native APIs that are only available in the ecosystem of a certain platform.
Closing the Gap between WebAssembly and Browser JavaScript
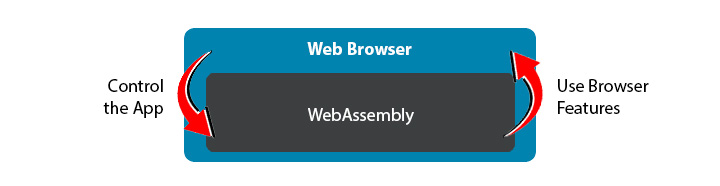
To make a great web application we want to take advantage of the browser’s capabilities for user interaction, to e.g. provide the input controls for the app with HTML. In essence, we need the ability to:
- Control the WASM app from browser JavaScript,
- and use browser features and APIs from within the WASM app.
When working with Qt Quick applications in the browser, there are two JavaScript runtimes running: The browser’s own JavaScript engine and the QML JavaScript engine within the WebAssembly application. Neither runtime can open a network serving port due to browser restrictions, so WebSocket communication is out of the question.
It's not possible to handle communication with pure JavaScript. But to implement custom native hooks in your application you have to look into the APIs provided by Emscripten, the C and C++ compiler for WebAssembly. This is time-consuming and a manual task for each project and use-case that you need.
The Qt way, WebAssembly Browser Communication using Qt WebChannel
Long before WebAssembly was introduced, Qt created the WebChannel components as a way to share data between a browser and a Qt application. Qt WebChannel shares QObject instances between a client JavaScript runtime and a server Qt application.
As the core implementation is very flexible, it allows to replace the used transport layer with a custom solution. Taking advantage of this fact, Felgo uses an own transport layer to support Qt WebChannel communication between WebAssembly and the Browser.
This means that you can access Qt objects from the browser JavaScript engine and use properties, methods, signals, and dynamic property bindings just as you would in QML. It makes communication truly seamless, and removes the need for custom C++ bindings.
Felgo applications already come with a predefined App::webObject, which holds many useful properties that are shared by default. For example, the title property is used to set the browser title directly in QML. The browser reacts to changes and updates the website title accordingly. You can also use the url property in the WebAssembly app to process the website url that the browser configures during the initialization of the WASM module:
import Felgo 3.0
import QtQuick 2.0

App {

  AppText {
    anchors.centerIn: parent
    text: webObject.url
  }

  webObject.onClientInitialized: {
    // Browser JS client is Ready!
    console.log("Client ready", message)
  }
}
To share your own Qt Objects with the browser, add them to the custom list of App::webObjects. See the tutorial below for a real-life example of how to control an embedded QML application with browser JavaScript and HTML. To learn more about building Felgo Apps for WebAssembly, see the documentation.
How to Create a Map-based Application for Web, Mobile and Desktop
You can find the full source code for the WebAssembly Map and Navigation Demo of this post on GitHub. It is a great starting point if you intend to build your own map application that fully runs cross-platform. To help you understand how it is built, let’s quickly explore the core components used by the routing app:
Basic App Setup and Map Component
To create a simple Qt Quick application with a map, you only need the App and AppMap components. This is the minimum code required for a Felgo App:
import Felgo 3.0
import QtQuick 2.0
import QtLocation 5.14
import QtPositioning 5.14
import "."

App {
  AppMap {
    id: appMap
    anchors.fill: parent
    plugin: MapboxPlugin { }
  }
}
The MapboxPlugin.qml is an own QML component made to keep the code clean and reusable. We use the Qt Mapbox GL Plugin, since it provides excellent rendering and user experience:
import Felgo 3.0
import QtQuick 2.14
import QtLocation 5.14

Plugin {
  id: plugin
  name: system.isPlatform(System.Wasm) ? "mapbox" : "mapboxgl"

  // Set your own map_id and access_token here
  parameters: [
    PluginParameter {
      name: "mapbox.mapping.map_id"
      value: plugin.name == "mapbox" ? "mapbox/streets-v11" : "mapbox.streets"
    },
    PluginParameter {
      name: "mapbox.access_token"
      value: "your-mapbox-token"
    }
  ]
}
Because mapboxgl is not supported on WebAssembly, we add platform specific code to use the tiled mapbox API instead. This is done by correctly configuring the name property of the Plugin configuration. We only use the Mapbox GL plugin for rendering on platforms other than WebAssembly.
Map Configuration, Marker Items, Geocoding and Routing
The example code also comes with a reusable MapMarker.qml component for the origin and destination markers on the map:
import QtLocation 5.14
import Felgo 3.0

MapQuickItem {
  visible: false
  property alias icon: iconItem.icon
  property alias color: iconItem.color
  anchorPoint {
    x: sourceItem.width / 2
    y: sourceItem.height
  }

  sourceItem: Icon {
    id: iconItem
    icon: IconType.mapmarker
    size: dp(30)
  }
}
It configures a MapQuickItem with an Icon that we can overlay on the AppMap. The following code adds a default center and zoom level for the map, as well as marker items for the origin and destination. To show a route within a QML Map, we also add the MapRoute item:
AppMap {
  // ...

  // Default location is Vienna, AT
  center: QtPositioning.coordinate(48.208417, 16.372472)
  zoomLevel: 10

  MapMarker {
    id: originMarker
    icon: IconType.mapmarker
    color: fromSearch.iconColor
  }

  MapMarker {
    id: destinationMarker
    icon: IconType.flag
    color: toSearch.iconColor
  }

  MapRoute {
    id: routeItem
    visible: false
    opacity: 0.6
    smooth: true
    antialiasing: true
    line {
      color: fromSearch.iconColor
      width: 5
    }

    function hide() {
      originMarker.visible = false
      destinationMarker.visible = false
      routeItem.visible = false
      routeModel.reset()
    }
  }

  onUserPositionAvailableChanged: {
    if(userPositionAvailable && enableUserPosition) {
      zoomToUserPosition()
    }
  }
}
With the onUserPositionAvailableChanged handler, the application automatically centers the map on the user’s GPS position as soon as it is available.
The QML RouteModel and GeocodeModel types provide the backend for routing and geocoding features in QML applications. Similar to the AppMap, we can choose the provider plugin we want to use. This example uses the Mapbox API for routing and geocoding:
// Routing backend
RouteModel {
  id: routeModel
  autoUpdate: false
  query: RouteQuery { }
  plugin: MapBoxPlugin {
    geocoding: true
  }
  onStatusChanged: {
    // when model calculated a new route we show it
    if (status == RouteModel.Ready) {
      routeItem.route = get(0)
      routeItem.visible = true
      // clear the old route query
      routeModel.query.clearWaypoints()
      appMap.fitViewportToMapItems(originMarker, destinationMarker)
    }
  }
}


// Geocoding backend
GeocodeModel {
  id: geocodeModel
  autoUpdate: true
  plugin: MapBoxPlugin {
    geocoding: true
  }
  onLocationsChanged: {
    routeItem.hide()
    // process geocoding results, show markers and route, etc ...
  }
}
That’s all the components you need for the core application. See the example project for further implementation details and the basic QML input controls for performing a location search and starting the route calculation.
The main function to trigger the routing flow is the doGeocodeAndRoute(fromAdress, toAddress) function found in the Main.qml. The application also displays an example route at startup by using the function in the Component.onCompleted handler:
// Geocode from, to and route
function doGeocodeAndRoute(fromAddress, toAddress) {
  routeItem.hide()

  // Tell Geocoder to query from, also queue toAdress
  geocodeModel.isFrom = true
  geocodeModel.nextQuery = [false, toAddress]
  geocodeModel.query = fromAddress

  // Update Input, just in case the input didn't come from these fields
  fromSearch.text = fromAddress
  toSearch.text = toAddress
}

// Preconfigured start and destination - automatically geocoded and routed
Component.onCompleted: {
  doGeocodeAndRoute("Bertel Jungin aukio D3A 02600 Espoo","Kolonitzgasse 9, 1030 Wien")
}
The pure Qt Quick implementation can already be used on all target platforms, also in the browser. All that’s left now is to replace the QML user interface of the application with a HTML-based solution. The next section shows how to share a custom web object with the browser’s JavaScript runtime and trigger the above routing flow from browser input controls.
How to use Felgo’s WebChannel for WebAssembly Communication
The Felgo App component comes with two ready-made properties you can use for browser communication: webObject and webObjects. The first one is a default object the application always shares with the browser. The second one is a list of custom objects for additional properties and APIs you want to share.
The webObject property comes with a ready-made set of properties, methods and signals:
- url: Provides the current url reported by the browser, updates to the url will trigger property bindings in QML.
- title: Current page title, used to set as well the Browser tab title.
- autoInitialize: If set to false, the WebAssembly transport won’t be initialized during app initialization. Rather by calling the initializeChannel method. By default is set to true
- initializeChannel: By setting autoInitialize to false, you can call this function later in your code once everything is ready to be shared with the browser.
- clientInitialized(message): This signal is called once the browser side WebChannel is ready. You can send custom objects or messages from the browser to your QML app using this signal. The corresponding handler is onClientInitialized.
The routing application also uses a custom shared object that is added to the webObjects. The custom object provides a browser interface for the route origin, destination and length:
import Felgo 3.0
import QtQuick 2.0

App {
  // ...
  webObjects: [
    QtObject {
      id: sharedRouteHandler
      property string from
      property string to
      property int length

      function doSearch() {
        doGeocodeAndRoute(from, to)
      }
    }
  ]
}
The object’s doSearch() function can be used to trigger a routing request with a browser button. In the surrounding HTML file that embeds the WASM application, we simply retrieve and use the sharedRouteHandler (the name references the id of the object in QML):
<script type='text/javascript'>
    ...
    function triggerRouting() {
      document.getElementById("routeLengthText").innerText = "";
      sharedRouteHandler.from = document.getElementById("search1").value
      sharedRouteHandler.to = document.getElementById("search2").value
      sharedRouteHandler.doSearch()
    }

    ...
    new QWebChannel(wasmTransport, function(channel){
        webObject = channel.objects.webObject;
        ...
        sharedRouteHandler = channel.objects.sharedRouteHandler;

        sharedRouteHandler.lengthChanged.connect(function() {
        document.getElementById("routeLengthText").innerText = sharedRouteHandler.length
        })
        // Display HTML controls
        document.querySelector('#inputArea').style.display = 'block';
    })
</script>
Felgo’s WebAssembly Communication using Qt WebChannel makes it easy to embed QML applications and communicate with the browser. Control your embedded Qt Quick application from HTML and deliver high-performance Qt-based web experiences without a sweat!
And the best thing: The same application can run on mobile, desktop and embedded platforms as well. Start your cross-platform application development with Qt and Felgo now!

More Posts like This
How to Build GPS Navigation Into Your App (In 7 Steps)
Release 3.9.0: Improved UX with Overlays & Tooltips and WebAssembly Browser Communication
 The Smart Bluetooth LE Guide: Add BLE to Your App with Qt and Felgo
How to Add Felgo to Your Qt App on Desktop, Mobile or Embedded
Dark Mode with Qt on iOS and Android using Felgo Native Code Components