
Felgo 3.9.0 is out, and it’s packed with features! Take advantage of easy WebAssembly browser communication using JavaScript, integrate overlays & tool tips, and use Google AdMob with ad tracking authorization support on iOS.
The update also brings many improvements, for example better performance and new features for sorting or filtering lists. For mobile platforms, the new release includes a switch to AndroidX instead of the Android Support Library and updated third-party SDK’s of Felgo Plugins.
- Migration Note: AndroidX replaces Android Support Library, AdMob Plugin
- Display Notches and System Navigation Bar Handling on Android
- Create Custom Overlay Popups and Improve the First-Time User Experience with an App Tour
- WebAssembly: Support for Geolocation Browser API and Seamless Communication between Qt Apps and Browser JavaScript
- Qt Quick Example App: How to Create a News Application with Felgo
- Updated Google AdMob Features and Felgo Plugins
- Improved Sorting and Filtering for ListModel and TableModel
- More Fixes and Improvements
Migration Note: AndroidX replaces Android Support Library, Felgo Plugins
Felgo now uses AndroidX components on Android to replace the old support library. It also now uses version 3.3.3 of the Android Gradle plugin. For new Felgo projects, no changes are required.
If you created your project with a previous version of Felgo, update your android/build.gradle. Update the android gradle plugin and dependencies:
buildscript {
  // ... repositories

  dependencies {
    // UPDATE VERSION:
    classpath 'com.android.tools.build:gradle:3.3.3'
  }
}

dependencies {
  implementation fileTree(dir: 'libs', include: ['*.jar'])

  // ADD THIS:
  implementation "androidx.appcompat:appcompat:1.2.0"

  // REMOVE THIS:
  // implementation "com.android.support:support-core-utils:28.0.0"
  // implementation "com.android.support:appcompat-v7:28.0.0"

  // ... more dependencies
}
Also change the file provider class name in android/AndroidManifest.xml:
<!-- UPDATE android:name HERE: -->
<provider android:name="androidx.core.content.FileProvider"
android:authorities="${applicationId}.fileprovider"
android:exported="false" android:grantUriPermissions="true">
When integrating Felgo Plugins, make sure to use Java 1.8 in your Android build, to avoid potential build issues. Add this compileOptions tag as child of the android tag in your android/build.gradle file:
android {
  // ...
  compileOptions {
    sourceCompatibility 1.8
    targetCompatibility 1.8
  }
  // ...
}
You can take the latest Felgo demo apps as a reference of those new settings.
If you are using the AdMob Plugin in your application, please also check out the new features described in this post. In addition to iOS, you now have to provide your AdMob app ID in your AndroidManifest.xml as well.
All details can also be found in the migration hints in the changelog.
Display Notches and System Navigation Bar Handling on Android
The update also improves the safe area handling with display notches and cutouts on Android. Felgo applications can now draw content behind the system navigation bar on Android. This affects devices with a soft back/home button row on the touchscreen.
Note: Similar to iOS, the bottom safe area is not automatically kept blank by the Page component. To handle this in your custom layouts you can use the Page::safeArea item for anchoring, or the NativeUtils::safeAreaInsets to add additional spacing in your UI if required. Those insets will be 0 on devices that are not affected, so this will work correct on any device.
import QtQuick 2.5
import Felgo 3.0

App {
  Navigation {
    navigationMode: navigationModeDrawer

    NavigationItem {
      title: "Page"
      icon: IconType.square

      NavigationStack {
        Page {
          title: "Page"

          Rectangle {
            // Use safeArea item of Page for anchoring custom layouts
            anchors.fill: parent.safeArea
            color: "#f04e26"
          }
          AppButton {
            text: "Bottom Button"
            anchors.horizontalCenter: parent.horizontalCenter
            // Anchor an item to the bottom safe area
            anchors.bottom: parent.safeArea.bottom
          }
        }
      }
    }
    NavigationItem {
      title: "Custom Bottom Bar"
      icon: IconType.minus

      NavigationStack {
        Page {
          title: "Page"

          // This would be your custom bottom bar
          Rectangle {
            color: Theme.colors.tintColor
            width: parent.width
            // Use your content height and add the bottom safe area
            height: dp(50) + nativeUtils.safeAreaInsets.bottom
            // Anchor the whole bar to the very bottom
            anchors.bottom: parent.bottom
          }
        }
      }
    }
    NavigationItem {
      title: "List / Flickable"
      icon: IconType.list

      NavigationStack {
        Page {
          title: "List / Flickable"

          AppListView {
            width: parent.width
            // This is now applied by default already
            bottomMargin: nativeUtils.safeAreaInsets.bottom

            model: 30
            delegate: AppListItem {
              text: "Item " + index
            }
          }
        }
      }
    }
  }
}
When using a default bottom tab navigation, no changes are required. The Navigation component already handles the required space for the safe area at the bottom.
Also AppFlickable and AppListView will add a default bottomMargin to account for the bottom safe area.
Create Custom Overlay Popups and Improve the First-Time User Experience with an App Tour
Improve Your User Onboarding and Engagement with an App Tutorial
The long-term success of your application starts with the first impression and lives from keeping users engaged. Even if your user interface is well-designed and intuitive, it is hard to learn the intended feature usage on-the-fly. Practical tips and explanations help to get a deeper understanding of the implemented systems and allow to engage and motivate users.
Take advantage of the new SDK components for tool tips and overlays to boost your user experience, for example by creating an app tour:

Display a Popup Bubble with AppToolTip
Use the AppToolTip item to display informational content for a target QML element. The tool tip automatically positions itself depending on the target's position and highlights the target by darkening the surrounding area.
It only takes a few lines of code to set up the tooltip:
import Felgo 3.0
import QtQuick 2.0

App {
  NavigationStack {
    Page {
      title: "ToolTip Page"

      AppButton {
        id: myButton
        text: "Open ToolTip"
        anchors.centerIn: parent
        onClicked: myToolTip.open()
      }

      AppToolTip {
        id: myToolTip
        target: myButton
        text: "This button opens a tool tip."
      }
    }
  }
}
See the AppToolTip documentation to learn about all supported features for customization and how to create a tour using multiple popups in a sequence.
The AppToolTip derives from another essential QML type that got added with this update: The AppOverlay simplifies the creation and handling of custom popups and dialogs in QML.
Performant Overlay Creation and Dialog Handling with AppOverlay
The new AppOverlay type allows to display any custom QML item or component as a modal overlay. It automatically covers item creation, layouting and animations for opening and closing the overlay.
In essence, it acts as a container for full screen overlays with the following features:
- Always On Top: The overlay makes sure to always open on top of other elements in your Felgo app window.
- Define Anywhere: Keep the overlay QML element within the page or view where you use it. No need to define all dialogs at the root level of your QML application. This speeds up start-up time, and simplifies communication between your views and dialogs.
- Respect Safe Area: Do not worry about display cutouts or notches. The overlay only shows content within the screen’s safe area, unless configured otherwise.
- Lazy Loading: The overlay supports dynamic item creation when using a QML Component as overlay source. Much like a QML Loader, the actual overlay content then loads on-demand. Closing the overlay automatically destroys the loaded object.
The following example shows how you can overlay the app with a custom dialog, defined within the Page that uses it:
import Felgo 3.0
import QtQuick 2.0

App {
  NavigationStack {
    Page {
      title: "Dynamic Overlay"

      AppButton {
        text: "Open Overlay"
        anchors.centerIn: parent
        onClicked: myOverlay.open()
      }

      AppOverlay {
        id: myOverlay
        sourceItem: overlayComponent // lazy-loaded content component
        onOpening: item.closeClicked.connect(myOverlay.close)
      }

      Component {
        id: overlayComponent
        Rectangle {
          id: item
          anchors.centerIn: parent
          color: Theme.backgroundColor
          width: dp(250)
          height: dp(130)

          signal closeClicked

          AppText {
            text: "Dynamic Overlay"
            y: dp(36)
            anchors.horizontalCenter: parent.horizontalCenter
          }

          AppButton {
            text: "Close"
            anchors.horizontalCenter: parent.horizontalCenter
            anchors.bottom: parent.bottom
            flat: true
            onClicked: item.closeClicked()
          }
        }
      }
    }
  }
}
A setup like this improves the performance and user experience, especially for applications that otherwise hold many instances of different top-level dialogs in the main QML window:
- Fast App Start: The QML engine does not create any dialog components at app start. Component creation goes together with the page or view that uses the overlay.
- Quick Page Creation: By lazy-loading the overlay content, each page only contains a lightweight container. The actual object creation for the content is done on-demand, when opening the overlay.
You can also use a single overlay container to show different sources on demand. For example to go through a sequence of overlays while keeping the app darkened until the user flow has finished. See the AppOverlay documentation for details and more usage examples.
WebAssembly: Support for Geolocation Browser API and Seamless Communication between Qt Apps and Browser JavaScript
With Felgo for WebAssembly, you can embed Qt applications in your browser. It is now also possible to integrate maps, navigation and geolocation features to your WebAssembly application. This includes the following improvements:
- The Qt Location module can now connect to browser APIs to retrieve the location when running on the Web.
- Due to MapBox legacy API deprecation, the WebAssembly MapBox Plugin is now updated to use the new modern tiled styles.
Try the WebAssembly routing example to see the magic yourself:
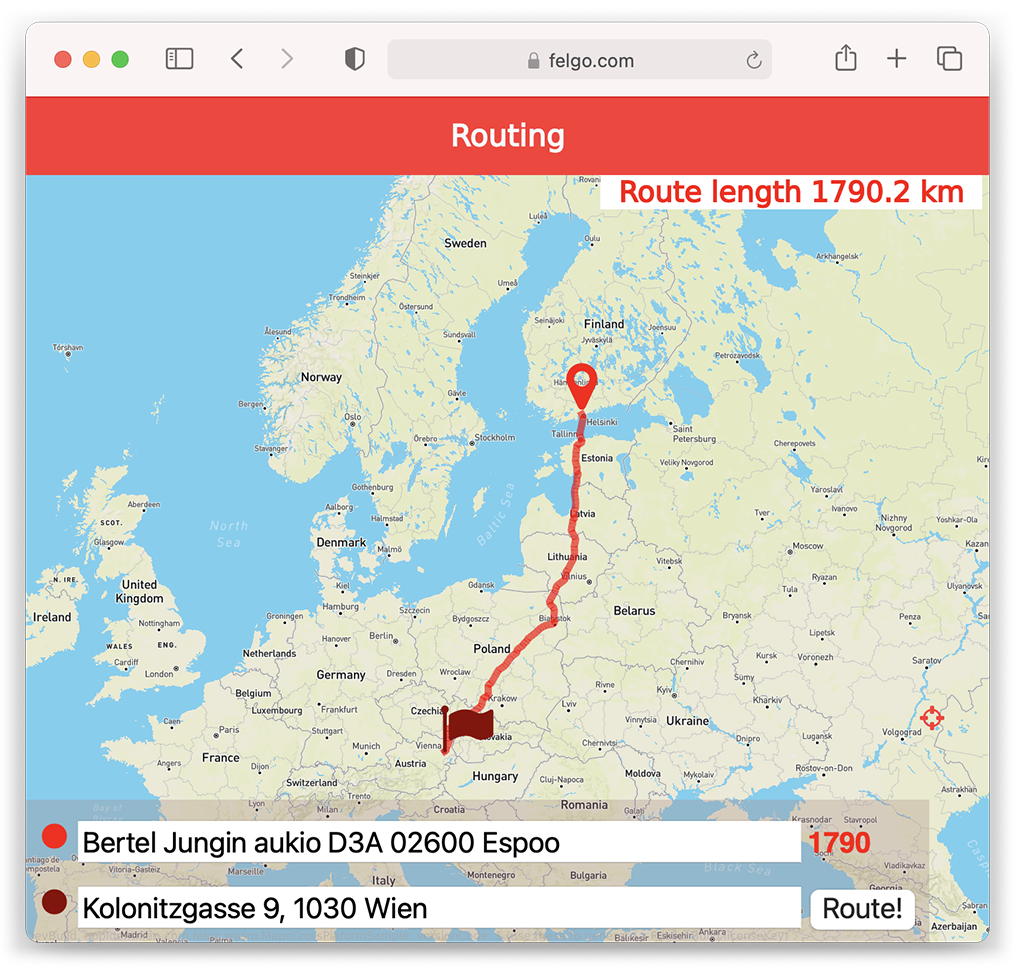

The example also takes advantage of another highlight for WebAssembly: By using a Felgo implementation of WebChannel transport, it's now possible to interact with shared objects from QML directly in the browser JavaScript. No need for custom C++ bindings anymore.
To make QML objects of your application available to the browser, add them to the App::webObjects property:
import Felgo 3.0
import QtQuick 2.0

App {

  webObjects: [
    QtObject {
      id: qmlDefinedObject
      property int count
      property string myString: "Hello!"

      function qmlMethod() {
        console.log("I was called from the browser!")
        return "You can return anything!"
      }
    }
  ]

  AppButton {
    anchors.centerIn: parent
    text: "Increment count"
    onClicked: {
      qmlDefinedObject.count++;
    }
  }
}
On the browser side you can access the shared objects and:
- read or write properties
- call methods
- handle value changes with connections
The following example function uses these features:
function felgoInitWebTransport() {

  new QWebChannel(wasmTransport, function(channel) {
    webObject = channel.objects.webObject;

    let qmlDefinedObject = shareObjects.qmlDefinedObject;

    // react to signal
    qmlDefinedObject.countChanged.connect() {
      console.log("Count updated!", qmlDefinedObject.count)
    }

    // access property
    qmlDefinedObject.myString = "Hi! I was updated from the browser";

    // call method
    qmlDefinedObject.qmlMethod( result => {
                                 console.log("qmlMethod returned", result)
                               });

  })

}
This makes interaction between website Javascript and embedded WASM applications truly seamless. You no longer require custom C++ code to bridge between the browser and your QML app, which is a huge time-saver. For more WebAssembly details and examples, see the Felgo for Web documentation.
Qt Quick Example App: How to Create a News Application with Felgo
The list of Felgo demos and examples keeps growing as well. This time, you can learn how to build an application that shows the latest breaking news:
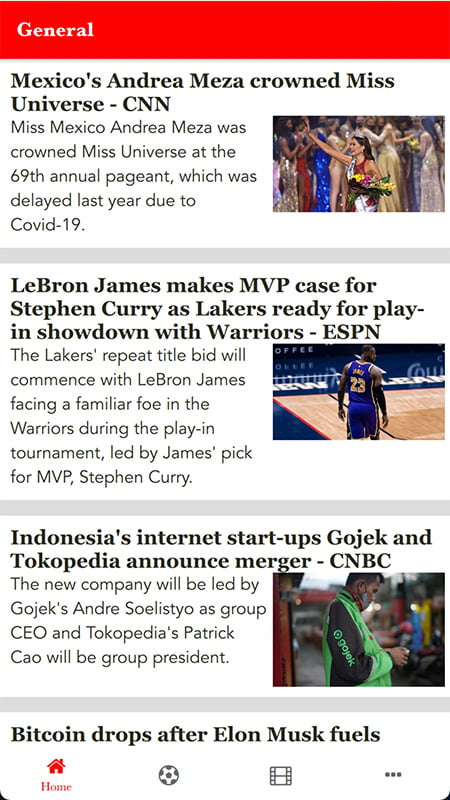
Creating a news application involves many interesting topics like:
- Get data from a server: Retrieve news data from an API to display latest articles in your app.
- Browse various categories of news: Use different endpoints or data sources to provide an own news feed per topic.
- Resize fonts dynamically: Customize the font size to provide readable text content for all your users.
- Manage light/dark mode at runtime: Use a runtime setting to switch the app theme to a dark mode that is easy on the eyes at night.
- Adaptive UI: Control the visibility of elements based on the app state and target platform
The full source code of the demo is available on GitHub. You can also find the new demo in the latest version of the Felgo Developer App.

Updated Google AdMob Features and Felgo Plugins
The AdMob Plugin now uses the AdMob SDK version 8.2.0 on iOS, and 19.8.0 on Android, which includes some changes to the plugin and provided features from the side of Google’s native frameworks. For example, the AdMobNative item is no longer supported and has been removed. This is because AdMob stopped supporting Native Express ads.
Ad Tracking Authorization Support on iOS
For compatibility with latest security measures on iOS 14.5+, the plugin now automatically asks the user for App Tracking Transparency authorization to use the IDFA for tracking purposes. Configure the new properties AdMobBanner::requestAdTrackingAuthorization, AdMobInterstitial::requestAdTrackingAuthorization and AdMobRewardedVideo::requestAdTrackingAuthorization to enable the feature.
Note: To support the ad tracking authorization, adapt your ios/Project-Info.plist. Add the NSUserTrackingUsageDescription key with a description of usag, for example:
<key>NSUserTrackingUsageDescription</key>
<string>This identifier will be used to deliver personalized ads to you.</string>
The usage of the AppTrackingTransparency framework requires Xcode 12 or later for building iOS apps. This update is required for new apps starting with iOS 14.5.
For existing Felgo projects, please update your iOS AdMob frameworks as described in the iOS integration guide.
AdMob App ID Requirement for Android and iOS
This mandatory update requires you to add your AdMob app ID to your android/AndroidManifest.xml and ios/Project-Info.plist. You can find your AdMob app id in the AdMob app console. Add this code to your Android manifest and replace the value with your own AdMob App ID:
<meta-data android:name="com.google.android.gms.ads.APPLICATION_ID" android:value="ca-app-pub-xxxxxxxxxxxxxxxx~yyyyyyyyyy"/>For iOS, a similar setting is required in ios/Project-Info.plist since Felgo 3.6.0:
<key>GADApplicationIdentifier</key>
<string>ca-app-pub-xxxxxxxxxxxxxxxx~yyyyyyyyyy</string>
You can find more information in the AdMob integration guide.
Full List of Felgo Plugins with Updated Native SDKs
In addition to the AdMob Plugin, the native SDKs of the following Felgo Plugins are now updated as well:
- The Firebase Plugin now uses the latest Firebase SDK versions. It uses the versions 7.9.0 on iOS and 19.0.0 on Android. For existing Felgo projects, please update your iOS Firebase frameworks as described in the iOS integration guide.
- The OneSignal Plugin now uses the SDK version 3.15.7 on Android. This is only a compatibility update. It does not require any changes in existing Felgo projects.
- The Amplitude Plugin now uses the latest Amplitude SDK version, version 8.3.0 on iOS and 2.31.0 on Android. It supports the latest iOS 14.5+ changes regarding App Tracking Transparency when using Amplitude::useAdvertisingIdForDeviceId. See the property's documentation for more information how to support IDFA.
- Updates the Soomla Plugin's Google Play billing service. It now uses the billing library SDK version 4.0.0 on Android. This update is mandatory for app updates submitted to the Google Play Store starting November 1, 2021.
Improved Sorting and Filtering for ListModel and TableModel
Features to sort and filter entries are common practice for data-centric applications. In Qt Quick applications, the QML SortFilterProxyModel is the go-to component in such scenarios. It wraps a source model and adds the ability to dynamically sort or filter the model data as required.
This update brings many additions to the SortFilterProxyModel type. The highlights include:
- Faster Sorting: The new implementation is faster when changing the sorting behavior. If no filters are changed, the model performs a simple sort without invalidating both the sorters and filters.
- Asynchronous Usage: By default, sorting and filtering happens synchronously. This means that the SortFilterProxyModel blocks the current operation and performs an update whenever a sort or filter configuration changes. The new implementation now also supports asynchronous sorting in the background.
- TableModel Support: To make the SortFilterProxyModel your best friend for all scenarios, you can now also use it together with the Qt Quick Controls 2 TableView and Qt Labs TableModel.
In addition, you can take advantage of new sorters and proxy roles: FilterSorter, FilterRole, RegExpRole and SingleRole. In case you want direct control over the applied sorting, you can show the elements in custom order by providing a list of positions with the customSortOrder property.
Optimize Performance by Sorting and Filtering in the Background
Using the default synchronous sorting and filtering blocks your user interface when processing large data sets. And even worse, the SortFilterProxyModel needs to update for each configuration change individually when modifying many sorters or filters at once.
To avoid this, use the SortFilterProxyModel asynchronously with the new delayed property. The following example uses two different sorters in conjunction. The implementation delays the sorting to perform calculations in the background. The SortFilterProxyModel updates only once after both sorters were changed:

import Felgo 3.0
import QtQuick 2.0

App {
  // data model
  ListModel {
    id: fruitModel

    ListElement {
      name: "Orange"
      cost: 3.25
    }
    ListElement {
      name: "Banana"
      cost: 1.95
    }
    ListElement {
      name: "Apple"
      cost: 3.75
    }
    ListElement {
      name: "Banana"
      cost: 2.35
    }
    ListElement {
      name: "Orange"
      cost: 1.25
    }
    ListElement {
      name: "Apple"
      cost: 2.45
    }
  }

  // sorted model for list view
  SortFilterProxyModel {
    id: sortedFruitModel

    // perform sort in the background, only sorts once when changing many sorters
    delayed: true

    sourceModel: fruitModel
    sorters: [
      StringSorter {
        id: nameSorter
        roleName: "name"
      },
      StringSorter {
        id: costSorter
        roleName: "cost"
      }
    ]
  }

  // list page
  NavigationStack {
    ListPage {
      id: listPage
      title: "SortFilterProxyModel"
      model: sortedFruitModel
      delegate: SimpleRow {
        text: name
        detailText: "cost: "+cost
        style.showDisclosure: false
      }

      // add checkbox to activate sorter as list header
      listView.header: AppCheckBox {
        text: "Sort by name and cost"
        checked: nameSorter.enabled
        updateChecked: false
        onClicked: {
          nameSorter.enabled = !nameSorter.enabled
          costSorter.enabled = nameSorter.enabled
        }
        height: dp(48)
        anchors.horizontalCenter: parent.horizontalCenter
      }
    } // ListPage
  } // NavigationStack
} // App
When updating the SortFilterProxyModel asynchronously, use the sortFinished() signal to run code after sorting has completed.
Sorting and Filtering with TableView and TableModel
The SortFilterProxyModel is also capable of acting as a proxy for a Qt Labs TableModel to then provide sorted and filtered data for a Qt Quick Controls 2 TableView.
TableModels manage data within a certain table cell, defined by a row and column. They do not provide roles for each property like a ListModel does. To correctly support the TableModel and role-based sorting and filtering with the SortFilterProxyModel, configure the columnRoleNames property. It maps each table column to a certain role name, allowing you to access and sort the column data by a role name instead of the column index.
The following example uses a TableModel and TableView together with SortFilterProxyModel:

import QtQuick 2.12
import Felgo 3.0
import Qt.labs.qmlmodels 1.0 // for TableModel

App {
  NavigationStack {
    Page {
      title: "Table Model Sorting"
      TableModel {
        id: myTableModel
        TableModelColumn { display: "checked" }
        TableModelColumn { display: "amount" }
        TableModelColumn { display: "fruitType" }
        TableModelColumn { display: "fruitName" }
        TableModelColumn { display: "fruitPrice" }

        // Each row is one type of fruit that can be ordered
        rows: [
          {
            checked: true,
            amount: 4,
            fruitType: "Orange",
            fruitName: "Navel",
            fruitPrice: 2.50
          },
          {
            checked: false,
            amount: 1,
            fruitType: "Banana",
            fruitName: "Cavendish",
            fruitPrice: 3.50
          },
          {
            // Each property is one cell/column.
            checked: false,
            amount: 1,
            fruitType: "Apple",
            fruitName: "Granny Smith",
            fruitPrice: 1.50
          }
        ]
      }

      SortFilterProxyModel {
        id: sortedModel
        sourceModel: myTableModel
        columnRoleNames: ["checked", "amount", "fruitType", "fruitName", "fruitPrice"]
        sorters: [
          RoleSorter {
            id: priceSorter
            roleName: "fruitPrice"
          }
        ]
      }

      AppCheckBox {
        id: sortSetting
        text: "Sort by Price"
        anchors.horizontalCenter: parent.horizontalCenter
        checked: priceSorter.enabled
        updateChecked: false
        onClicked: priceSorter.enabled = !priceSorter.enabled
        y: dp(24)
      }

      TableView {
        anchors {
          top: sortSetting.bottom
          bottom: parent.bottom
          left: parent.left
          right: parent.right
          topMargin: dp(24)
        }
        columnSpacing: dp(12)
        rowSpacing: dp(12)

        model: sortedModel
        delegate: AppText {
          text: model.display
          padding: dp(6)
        }
      }
    }
  }
}
For more information and all supported features, see the SortFilterProxyModel documentation.
More Features and Improvements
Felgo 3.9.0 includes many more improvements, for example:
- The NativeUtils::softInputMode property is now also supported on iOS. It supports the modes NativeUtils.AdjustPan and NativeUtils.AdjustNothing.
- ImagePicker now correctly displays images that are stored on iCloud on iOS, sorts images by date taken on Android, and provides a new method ImagePicker::clearSelection() to clear out the current selection.
- Fixes the AppModal disappearing when the window height or orientation changes.
- Fixes wrapping and clipping of AppTextEdit, AppTextInput and InputDialog placeholder text.
For all relevant changes, features, and fixes of recent Felgo updates, please check out the changelog.
How to Update Felgo
Try out these new features by following these steps:
- Open the Felgo SDK Maintenance Tool in your Felgo SDK directory.
- Choose “Update components” and finish the update process to get this release as described in the Felgo Update Guide.
- Update Felgo

If you haven’t installed Felgo yet, you can do so now with the latest installer from here. Now you can explore all of the new features included in this release!
More Posts Like This

Release 3.7.0: The New Developer App and the Best Examples and Demos for You

Release 3.7.0: Bluetooth LE (Low Energy) with QML, Apple Sign In, Secure Keychain Storage


